What Is Order Desk? An Ultimate Guide for Beginners

Order management is a tedious task for online sellers. But it can be simplified now with Order Desk.
Order Desk is a platform for managing orders in a dashboard. This platform integrates with hundreds of marketplaces and fulfillment services. It allows you to automate and customize order management, inventory management, and other processes.
However, operating Order Desk is not easy for beginners. That is why we are giving you an ultimate guide here.
If you want to quickly familiarize yourself with this platform, keep reading!
What is Order Desk & How does it work?
Order Desk is a specialized platform for order management, which was founded in 2014 in the US. According to its website, this company has served 161 countries and helped manage over 100 million orders since it was launched.
Order Desk integrates with various channels including shopping carts, shipping companies, fulfillment providers, payment gateways, and so on. Whether you are a merchant, supplier, artist, print supplier, or shipping carrier, you can use Order Desk to streamline your order management process.
Once you connect your channel with Order Desk, new orders will be imported to Order Desk. You can add and customize folders to sort out all orders. With Rule Builder, you can set up rules to manage orders and send emails to your customers, carriers, or suppliers automatically.
In addition, Order Desk allows you to sync inventory from your suppliers, track orders, export reports, and conduct data analysis.
Order Desk pricing
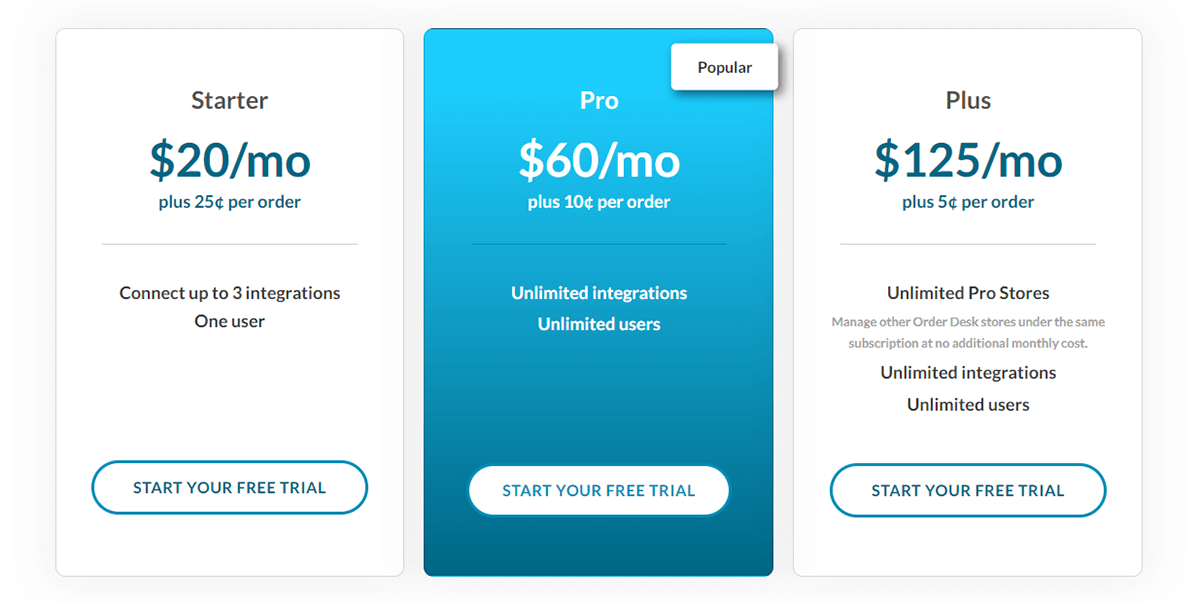
Order Desk currently offers 3 subscription plans. The price and features for each plan are included as follows.
Starter
The Starter plan charges you $20 as a monthly subscription fee plus 25¢ per order for usage and storage. It supports 3 integrations and one user.
Pro
This pricing plan costs $60 monthly plus 10¢ per order. It is more expensive than the Starter plan. The benefit is that it permits unlimited integrations and users. If you sell across more than three channels, the Pro plan will be a good fit for you.
Plus
The Plus subscription costs $125 monthly plus 5¢ per order. It comes with features including unlimited Pro stores, unlimited integrations, and unlimited users. You can manage other Order Desk stores under the same subscription at no additional monthly fees.
Order Desk provides a 30-day free trial. In the trial period, you only pay for the order fee, and the monthly subscription fee is waived. This is beneficial if you just want to test the platform at no cost.
Pros and cons of Order Desk
Order Desk comes with pros and cons. Take both sides into consideration when deciding if you use it or not.
Pros
Multi-channel integration: Order Desk supports integration with various e-commerce platforms, marketplaces, and fulfillment services, allowing you to manage orders from multiple channels in one place.
Automation tools: Order Desk offers robust automation features. You can set up rules and workflows to automate repetitive tasks with these features.
Inventory management: This order management system can help manage inventory levels across multiple channels, reducing the risk of overselling and providing real-time visibility into stock levels.
Order merging and splitting: Order Desk has merging and splitting orders functions. It is convenient to route your orders to different suppliers or fulfillment centers.
Reporting and analysis: This platform offers reporting and analysis features to track and analyze order and inventory data, helping you make informed business decisions.
Customer communication: Communication with customers is also viable on Order Desk. You are allowed to contact your customers via email for order status updates and notifications.
Cons
Learning curve: There is usually a learning curve associated with setting up and configuring Order Desk, especially if you are new to order management platforms.
Interface complexity: The interface might be a bit complex for you if you prefer a simpler or more intuitive interface.
Customization complexity: Though customization is a strength, extensive customization options may be overwhelming.
Monthly subscription fee: Even though the subscription fee is as low as $20 per month, it is still costly for budget-tight sellers.
How to use Order Desk?
Operating Order Desk might be not that easy for beginners, especially when there are many tools to explore.
Next, we will walk you through the process to use Order Desk for order management.
1. Create an Order Desk store
To make use of Order Desk, you must create a store first.
Here are the steps you can take.
1) Go to the homepage and click “Sign Up”
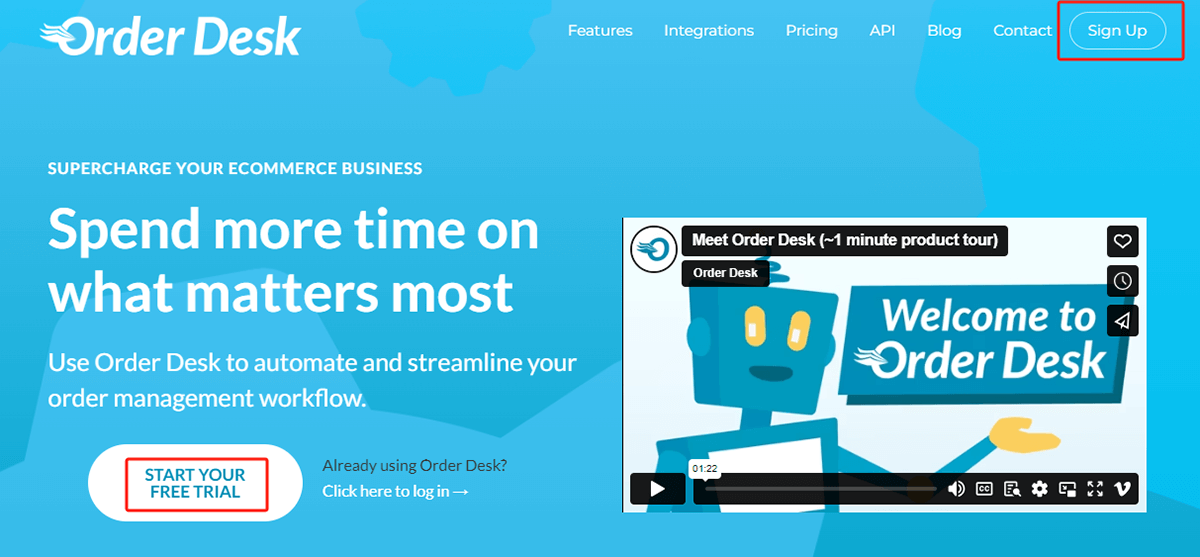
Alternatively, you can click “START YOUR FREE TRIAL” to start the registration process. You will be redirected to the Pro plan page then. But no worries. You can adjust your subscription after the free trial.
2) Fill in the store name and your personal information
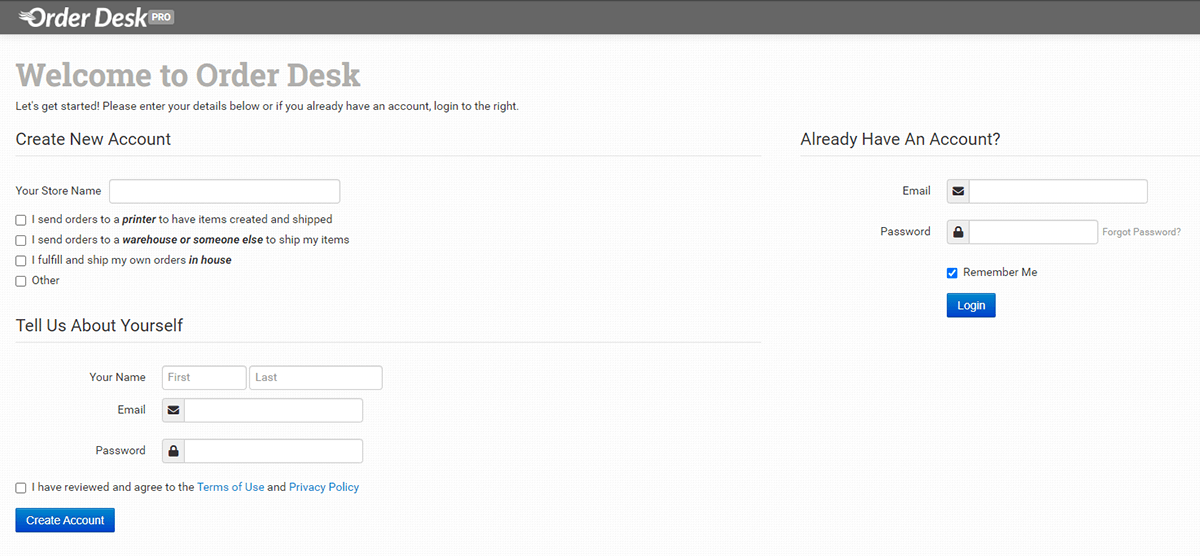
Under the “Create New Account” section, there are 4 options to choose from. If you are running a print on demand business, you can choose to send orders to a printer. If you are using a third-party fulfillment service, you can tick the second box. But if you fulfill orders by yourself, tick the third box. Otherwise, select the last one.
As for the store name, you should make it easy to identify from other stores. Say that you are dropshipping on Shopify, you may set the name as your Shopify store name.
3) Click “Create Account”
After you finish the steps above, you are now having an Order Desk account.
2. Integrate your retail store with Order Desk
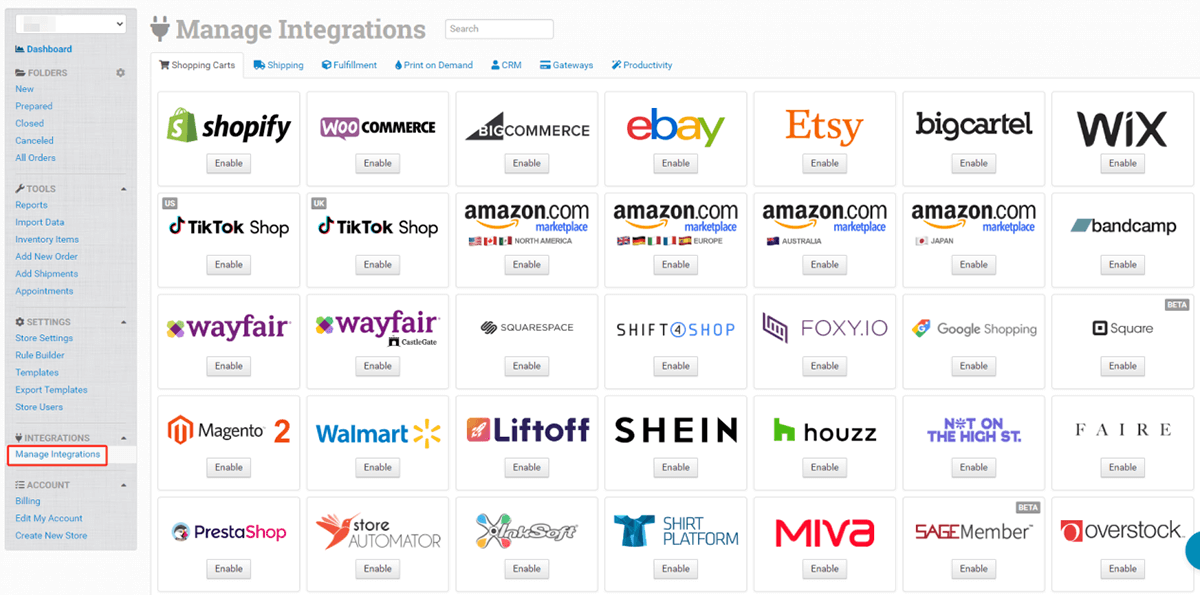
Order Desk supports integration with various channels. It also provides an API to connect with a channel that may be not integrated.
Here, we suppose you are selling on Shopify as a dropshipper. You can follow these steps to connect your Shopify store with Order Desk.
1) Click “Manage Integrations” & enable Shopify under “Shopping Carts”
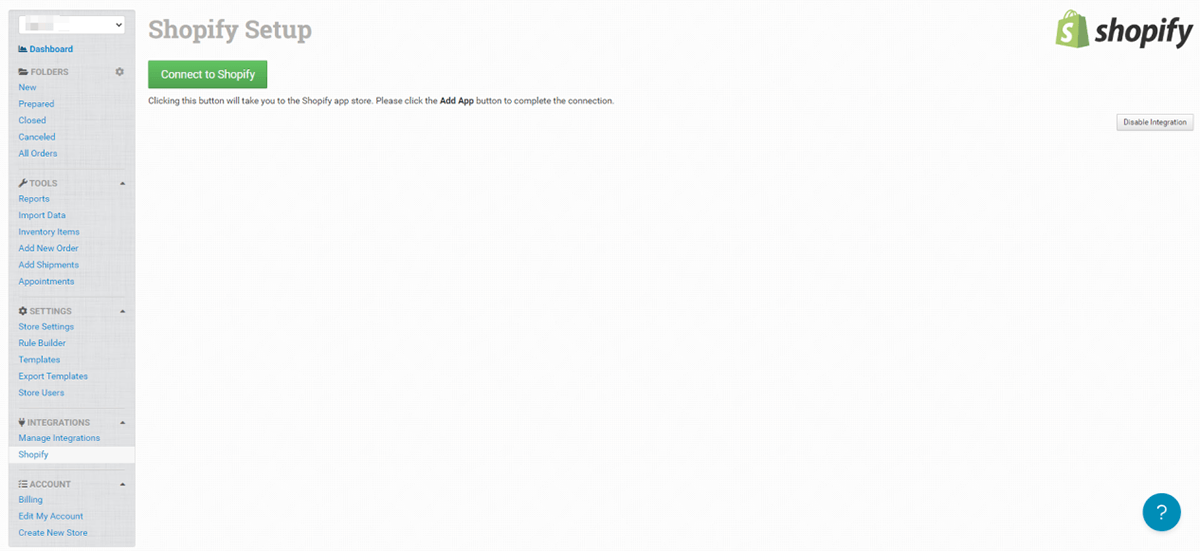
2) Click “Connect to Shopify”
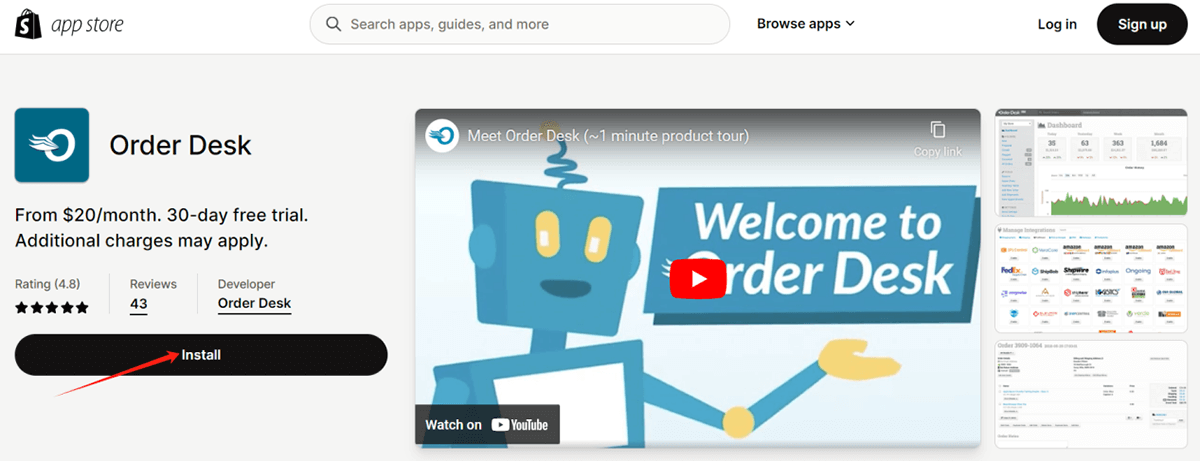
3) Click on “Install”
4) Log into your Shopify Store
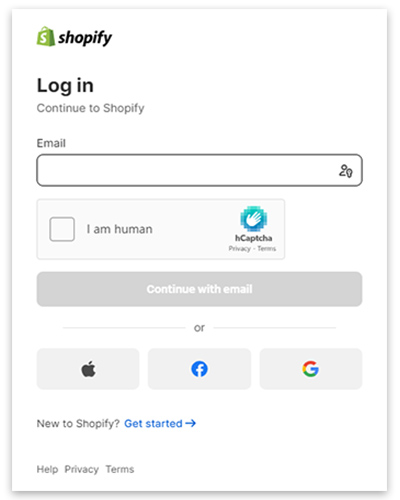
If you have already been logged into your Shopify store, you may skip this step.
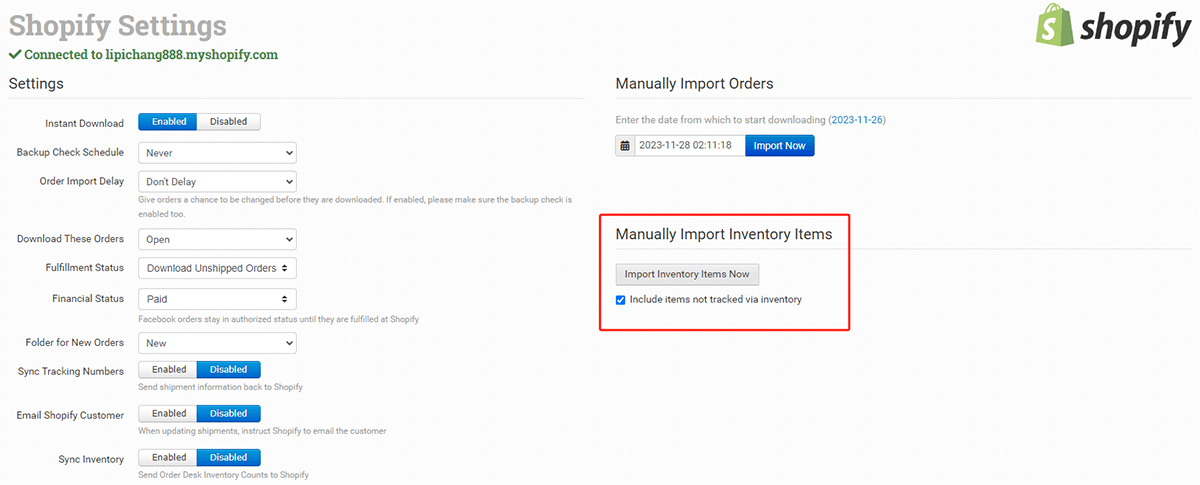
5) Set up Shopify settings
This step mainly involves ticking some buttons and making a choice among two or several options.
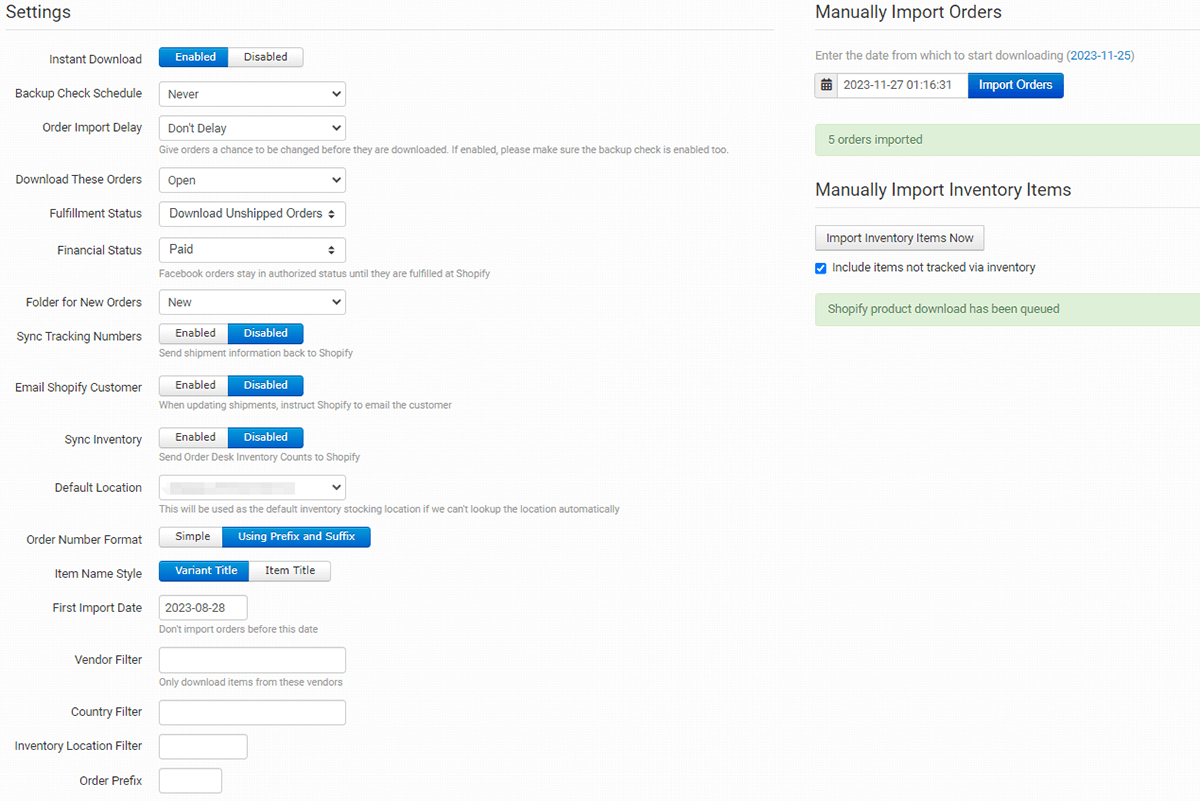
Some important terms you may not know are explained below.
Instant download: Your orders will immediately come into Order Desk as they are placed.
Backup Check Schedule: This option will tell Order Desk to pull in your orders on a regular basis, every day and every 7 days, for instance. “Never” here is equal to “Instant download”.
Order Import Delay: An order won’t be imported to Order Desk until your set time expires. So you have time to make any changes to the order before importing it.
For an explanation of other terms, please refer to this article.
Integrate with API
Order Desk provides API to integrate with a channel that has been not integrated into their system.
The Order Desk API is a helpful tool that allows you to pull order status, add orders, add shipments, and retrieve inventory items. To create your store API, you should go to “Store Settings” and Click “API”. Then you will get the store ID and API Key.
3. Import orders
There are two ways to import your orders into Order Desk. One is through integration, and the other is uploading import data to bring in orders.
Import orders through integration
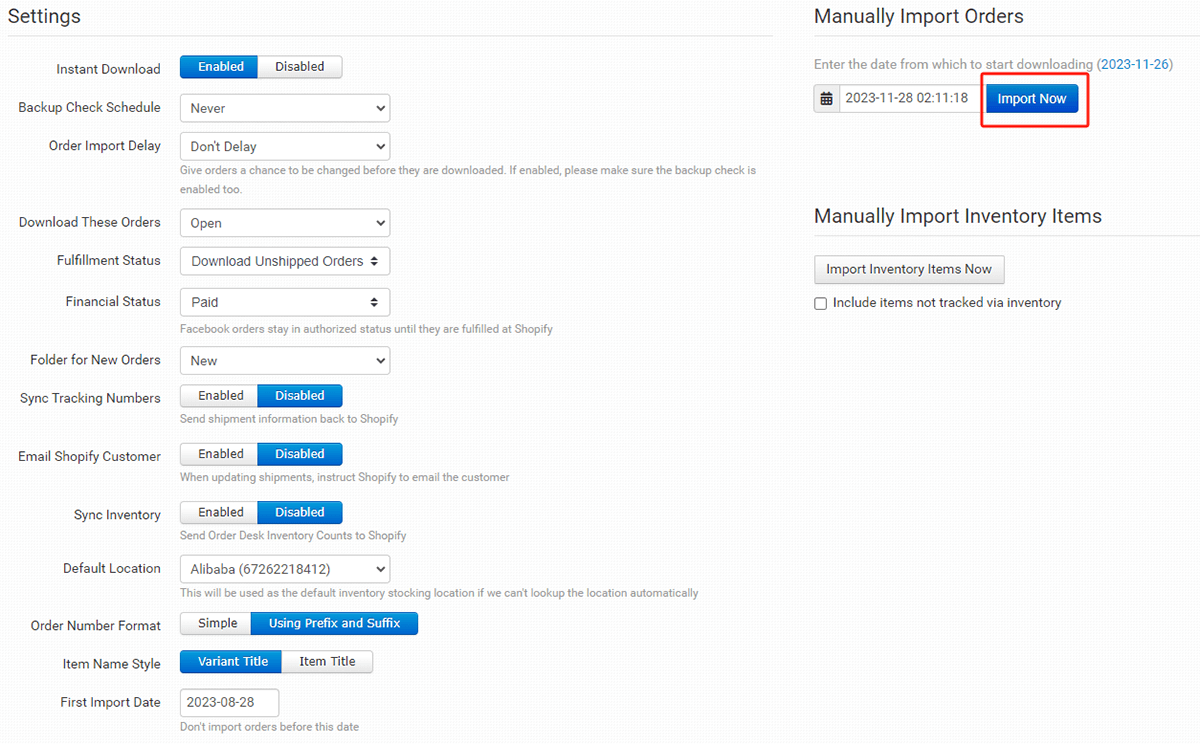
When you set Shopify setting, you can see “Manually Import Orders” on the right. Click on the button “Import Now”, and you can manually sync your orders to Order Desk.
Set up Import Template
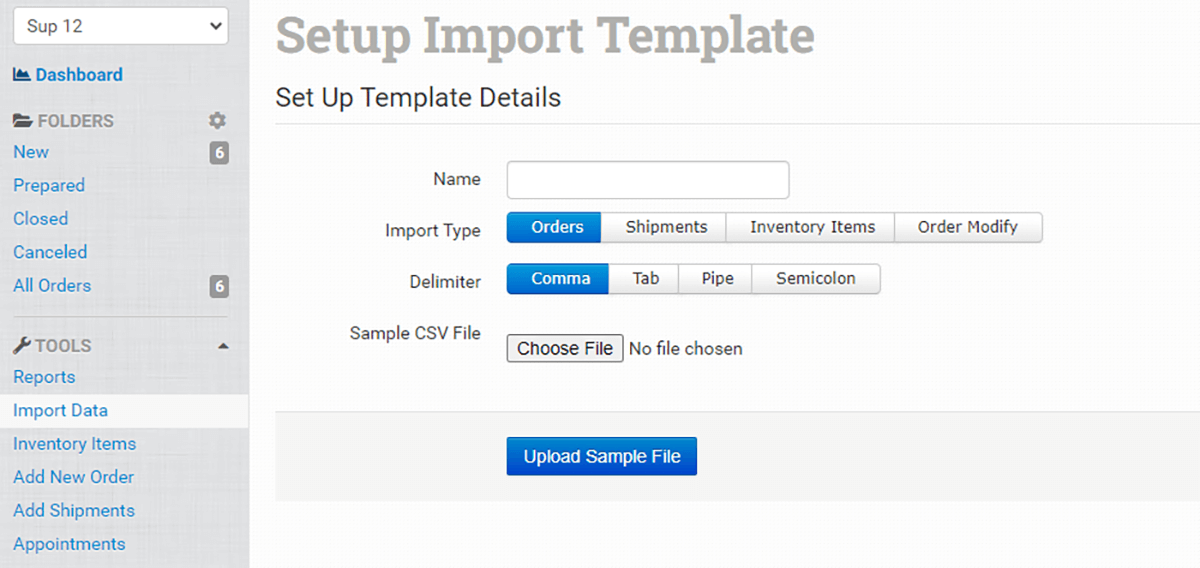
Alternatively, you can import orders with the “Import Data” tool. This method is especially useful when a channel is not an integration on Order Desk.
To upload import data, you need to set up the import template. After that, you can upload files (.csv, .xlsx, or .txt) with your order details.
What is worth noticing is that the template name should be unique for your Shopify store. Because you may copy it to other stores for another use in the future.
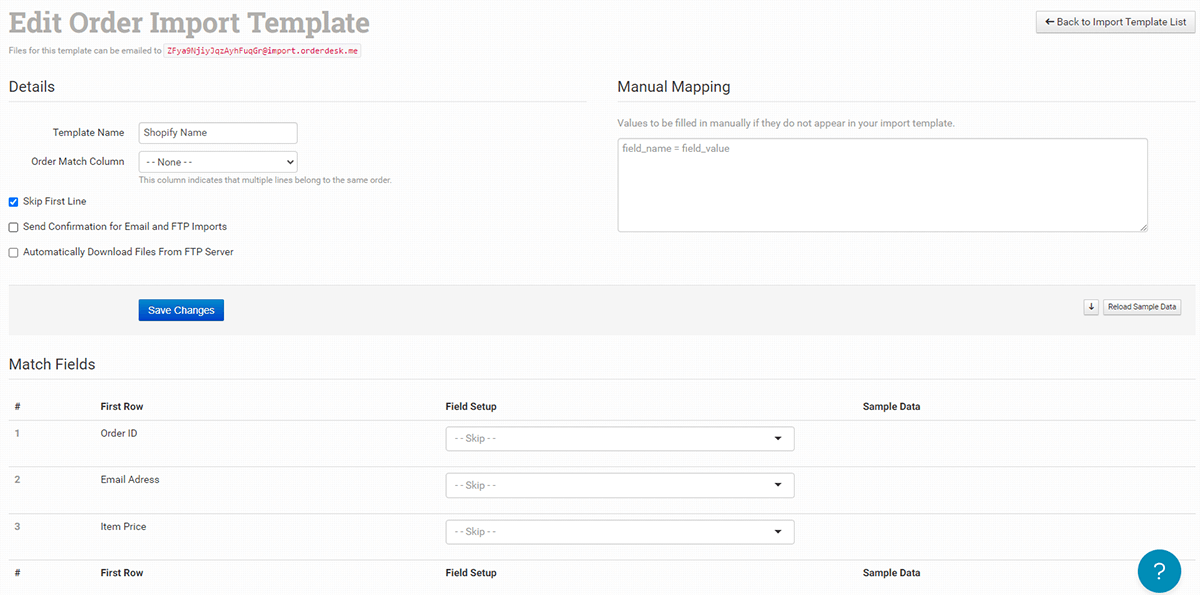
After uploading the sample file, you can edit the order import template. Read this guide on how to upload import data.
4. Integrate with your supplier
Connecting Order Desk with your supplier is a crucial step to have your orders fulfilled. If Order Desk integrates with the supplier, you can connect to the supplier from the INTEGRATIONS section. Otherwise, you can use API to realize the integration.
Among numerous dropshipping suppliers, Sup Dropshipping is one of the best to work with.
Sup Dropshipping is an all-in-one dropshipping company based in Hong Kong. From sourcing to shipping, we handle everything for you, which can free you up from various hassles.
Having served thousands of B2B companies, we are experienced to help you find top-selling products. Our platform allows you to import and list items to your store with a few clicks. When your customer places an order, we will deliver it directly to the doorstep. Before the shipment, product inspection is conducted to ensure your item is in good condition. Most importantly, we offer various customization options to brand your business. This makes it easier for you to stand out from the competition with personalized products.
Below are the steps to integrate Orderdesk with Sup Dropshipping.
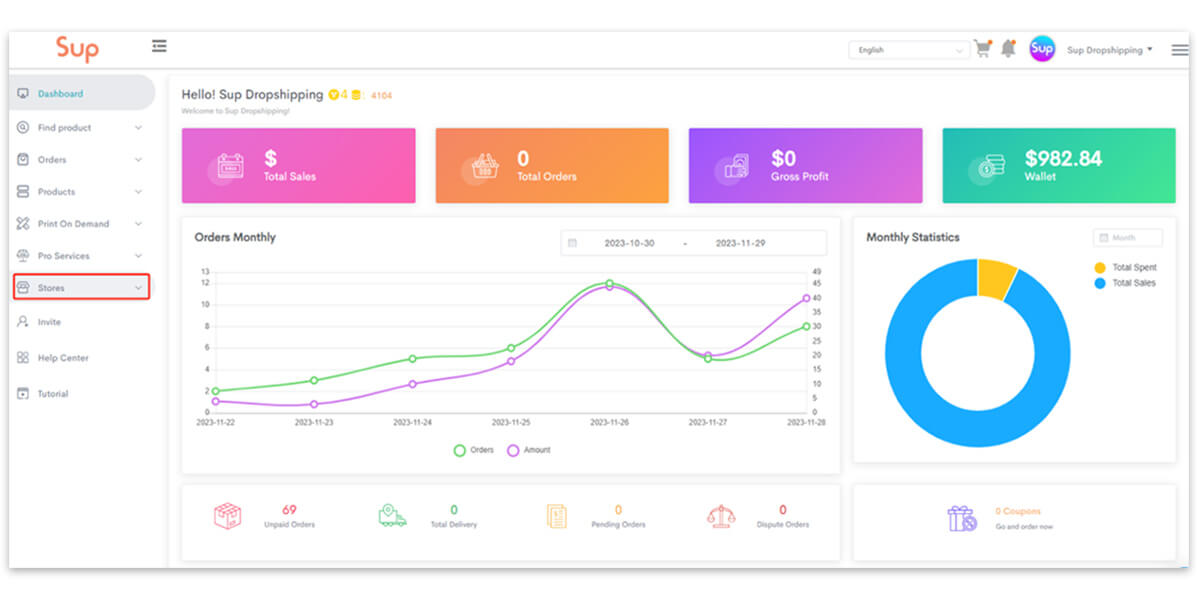
1) Sign in to your Sup account
2) Click “Stores” and choose “Order Desk”
3) Copy the API in your Order Desk store

4) Paste the store ID and API Key
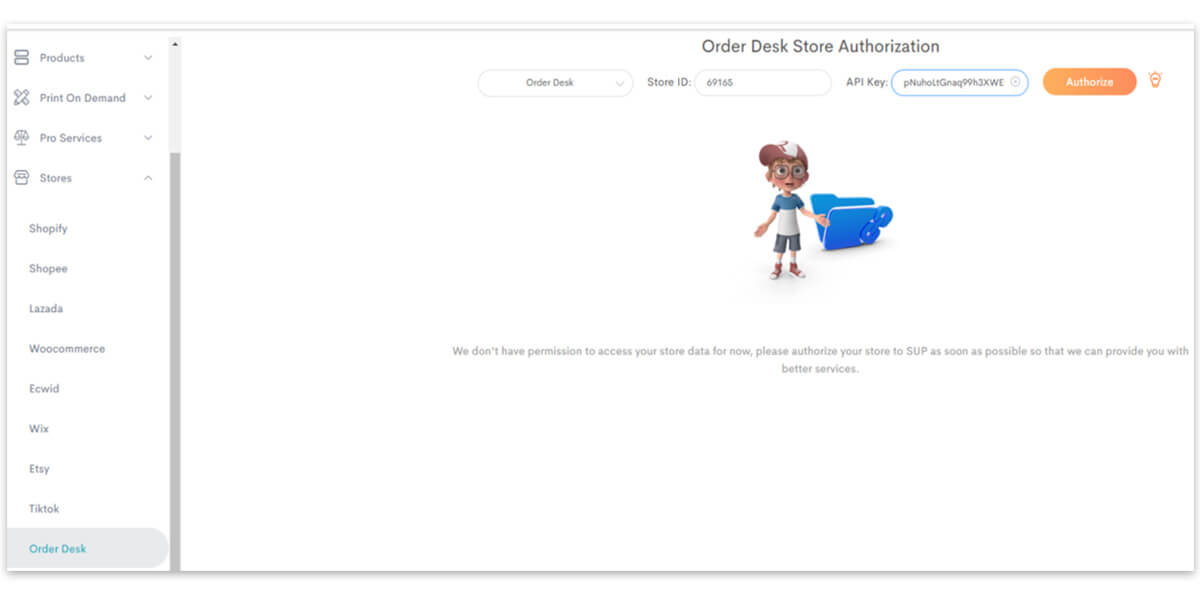
5) Click “Authorize”
Once you integrate Order Desk with Sup, Order Desk can send us emails to fulfill your order when an order is placed in your store.
5. Sync the inventory
In the dropshipping business model, you sell without inventory. But syncing inventory on Order Desk can help you stay updated on product availability and manage inventory during a busy selling season.
To sync your inventory, you can import inventory items after you finish Shopify setting.
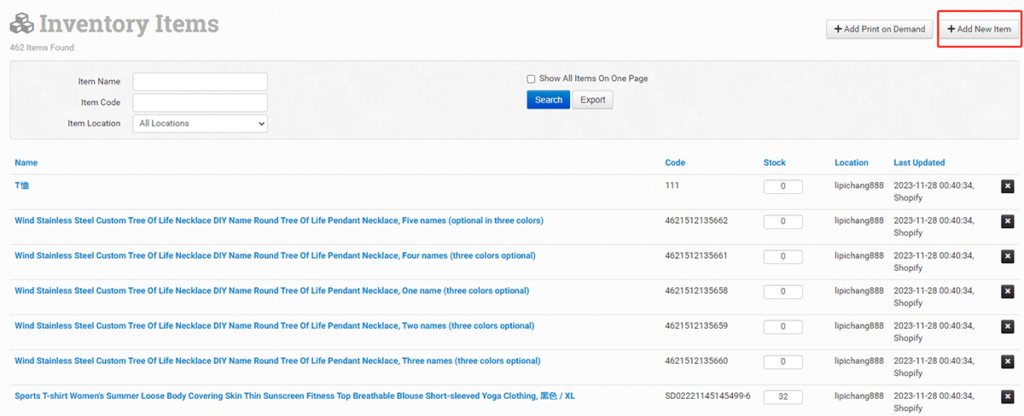
If your selling platform is not integrated with Order Desk, you can click “Inventory Items” and then “Add New Item” on the right corner to manually add stock items.
6. Manage your orders
One of the most important features of Order Desk is that it enables you to manage your orders easily in one place.
Take a closer look at how this feature works.
Through Folders
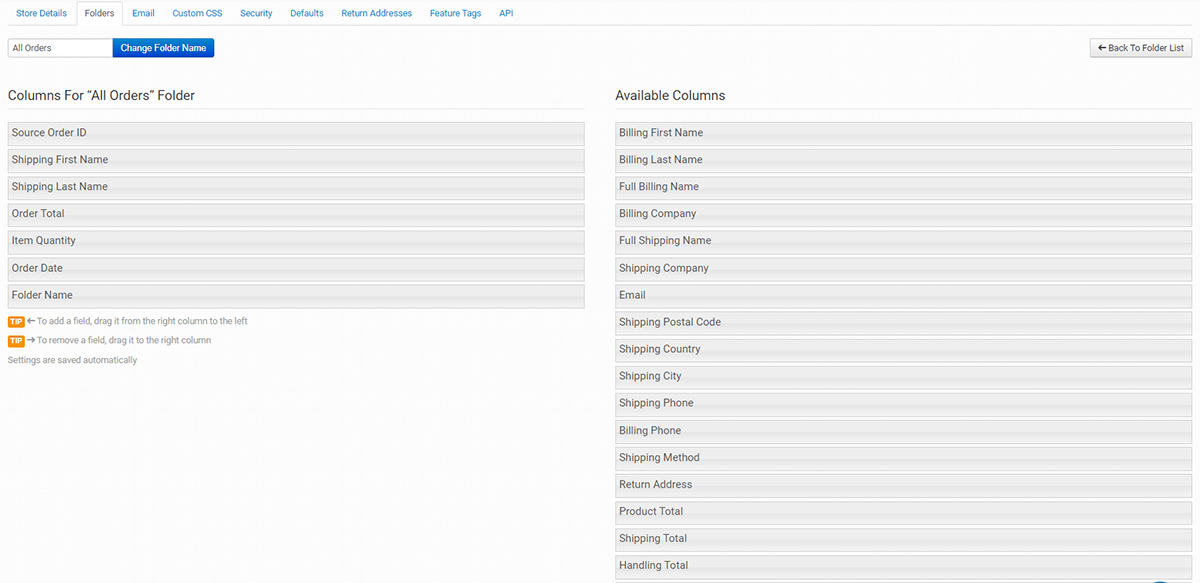
The simple way for order management is to customize your folders. By default, there are 5 folders, as shown in the following.
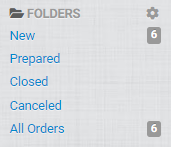
But these folders are usually not enough, and you can add new folders. For example, if you have returned items or resending items, you may add a “Returned” or “Resend” folder. Just click the setting icon beside “FOLDERS” and then click “Add Folder”.
You can also customize each folder by adding or removing a field.
For example, I want to see the shipping method for each order. So I drag the “Shipping Method” from Available Columns to the current folder. If I don’t want to see “Shipping Last Name”, I will drag it to the right “Available Columns” section.
Within each folder, you may choose to create, merge, or delete orders. You are allowed to move orders to another folder too.
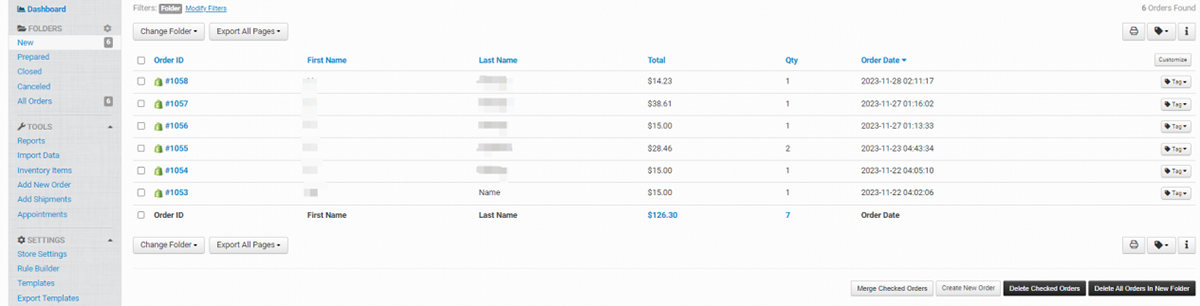
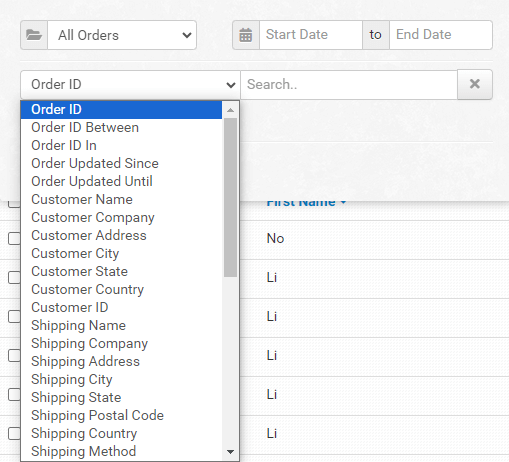
If you hit on “Modify Filters” under the folder name, you can search for an order through various filters.
Through Rule Builder
Rule Builder is used to automate the management of your orders or the items within your orders. With it, you can set different rules and actions according to your needs.
Here are the steps involved in creating a rule for an order.
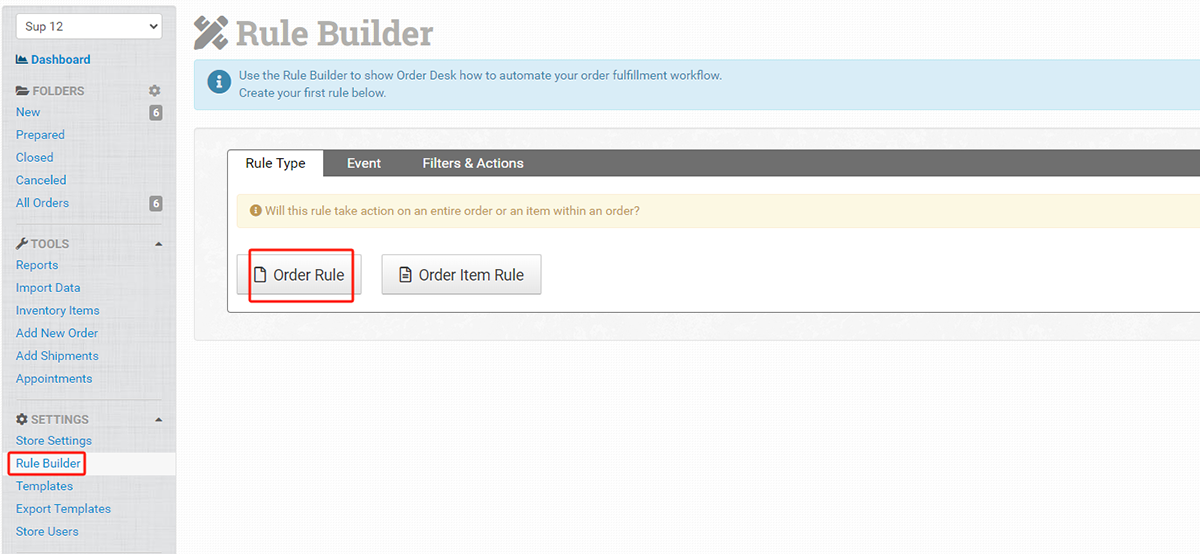
1) Click “Rule Builder” and then “Order Rule”
2) Add an event that will trigger the rule

An event is what happens to the order that triggers the rule. Events listed on Order Desk include “Order is Imported”, “Order Confirmed”, “Folder is Changed”, “Order is Split”, etc. If you want to add an event that is not found in the drop-down menu, you may click “Or Select a Custom Event” to customize it.
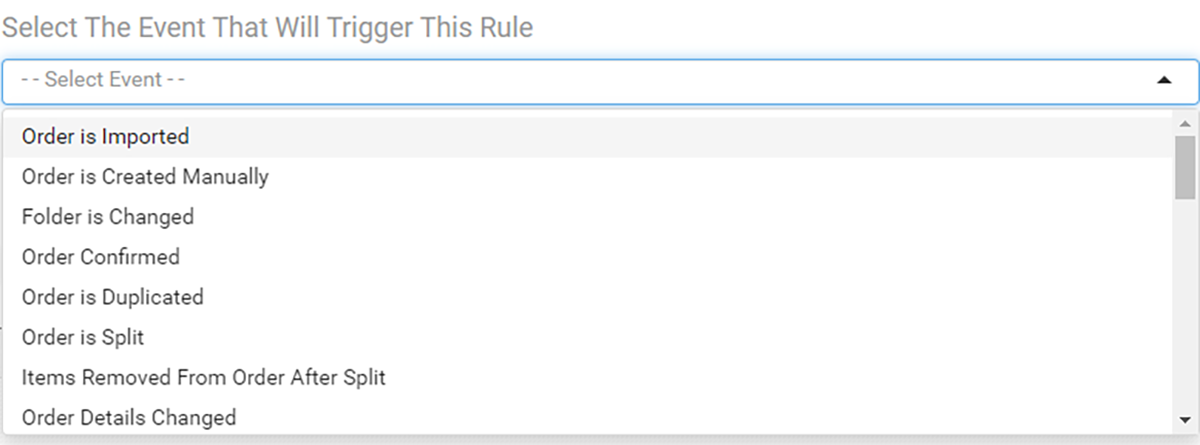
Here we take an example that you need Order Desk to send emails to you when there are new orders.
In this case, you can choose “Order is imported” as the event.
The next step is to add filters.
3) Add filters and actions for the rule
Filters are criteria for when a rule functions.
In our example, the filter is the folder name equals new.
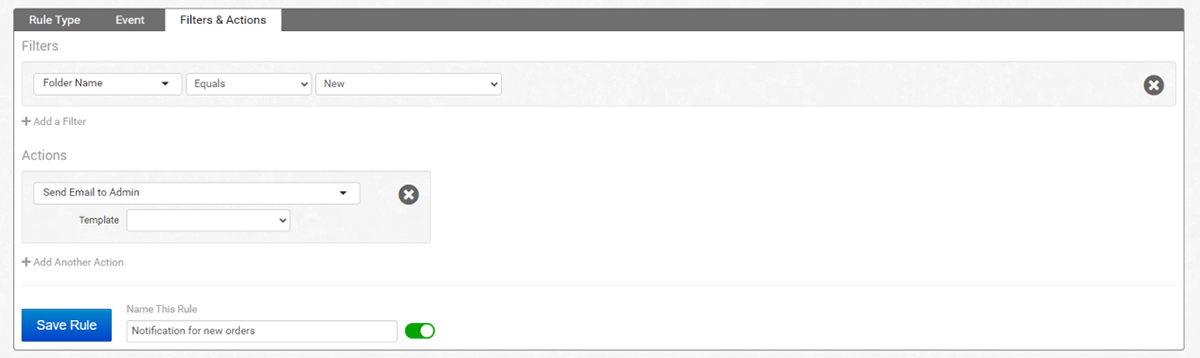
As for the action, it should be “Send Email to Admin”. Refer to this article to learn about how to create Email templates.
Finally, you should name the rule and make it different from other rules that would be set.
4) Click “Save Rule”
Having finished the steps above, you successfully create a rule with Rule Builder. But remember that, there are still many things left to explore with this tool. You may create more rules to find out what more it can do for you.
Conclusion
Order Desk is a powerful order management platform for e-sellers. It enables you to automate the process of managing orders and inventory. Besides that, it also provides features to export reports, track shipments, and contact customers.
The thing is that it takes some time to learn about how to operate this platform. Additionally, the subscription fee can be costly for start-ups and small businesses with a tight budget.
But Order Desk offers a 30-day free trial, it is worth trying it. Connecting it with Sup Dropshipping will further streamline your workflow. If you have any questions about how to use Order Desk and Sup, please leave a comment or contact us via livechat.
About the Author

May
May is a blogger at Sup Dropshipping with over 5 years of experience in eCommerce. May’s passion for eCommerce drives her to stay updated on the latest trends and share her expertise with you through her blog. In her spare time, she likes to read a novel or chat with friends.


Leave a Reply